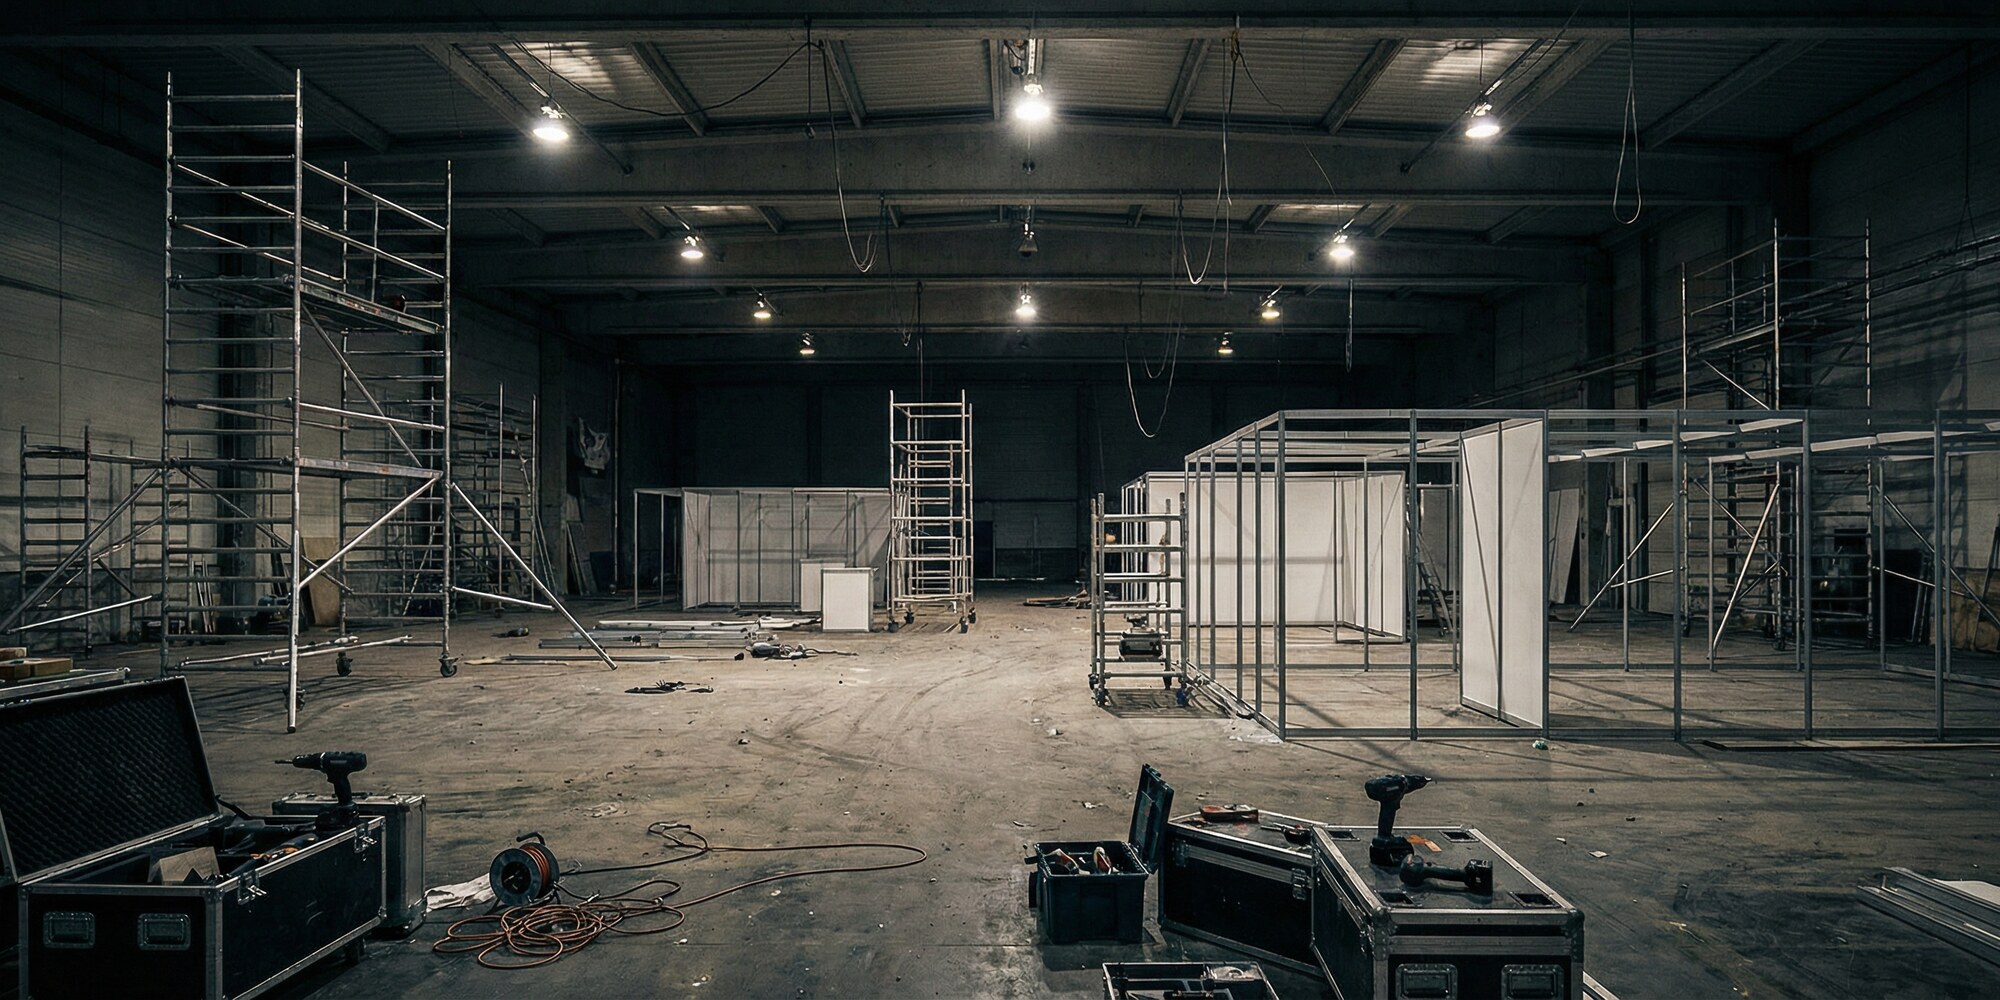
A 30×30 island exhibit that took three weeks to build needs to go up in eight to twelve hours with a crew that has never seen it before. Every design decision — how components connect, how they're labeled, how heavy they are, how the manual reads — either supports that crew or fights them. Installation and dismantle (I&D) is where fabrication quality is finally proven, and where months of careful work in the shop either earn the client's trust or lose it permanently.
Most exhibit fabricators understand the challenge abstractly. Fewer have systematically engineered their builds around it. The gap shows on show floors every year: bolts buried inside cavities that require a third hand to reach, panels labeled "A" through "Z" with no indication of which "A" goes where, structural connections that need three workers holding simultaneously while a fourth tightens a fastener from an awkward angle. These aren't craft failures — they're design failures, and they're entirely preventable.
This guide covers the fabrication-side discipline that makes the difference: how to design exhibits that install cleanly, document them in a way an unfamiliar crew can follow, navigate union jurisdiction without losing hours, and build a dismantle protocol that brings exhibits home intact. It's the operational counterpart to the crating and shipping guide published here in March — that piece covered getting the exhibit to the venue safely; this one covers what happens after the crates are opened.
The Convention Center Is Not Your Shop
The first design principle for I&D-ready fabrication is also the hardest to internalize: the show floor installation environment is categorically different from the shop where the exhibit was built. Convention center floors are uneven poured concrete, often slightly out of level. Lighting is uniform overhead fluorescent — directional task lighting, the kind a finish carpenter relies on, doesn't exist. The installation window is fixed, non-negotiable, and typically compressed: union crews begin drayage at a defined move-in time, and exhibitor labor begins the next morning at a time determined by the show decorator. A crew of four to six workers with standard hand tools has eight to twelve hours to complete an installation that a fabricator's own team might estimate at two days.
Temperature and humidity on move-in day may be different from the shop environment. MDF panels that were perfectly fitted in a climate-controlled facility can swell or shift in a loading dock environment. Structural elements that were tested on a level shop floor may need shimming on uneven concrete. Hardware that was pre-torqued in the shop should have torque specs documented in the installation manual so field crews can recheck and confirm.
The fabricator who designs with this environment in mind arrives at the show floor with fewer emergencies. The one who assumes show-floor conditions mirror the shop will hear about it in the post-show debrief.
Ten Design Decisions That Make or Break Installation Speed
The specific engineering choices that determine I&D efficiency can be evaluated during the design phase, before fabrication begins. The ten most consequential:
- Connection accessibility. Every fastener must be reachable with a standard tool by one person in a normal working posture. No bolts inside closed cavities, no connections that require holding two panels simultaneously while tightening a third element.
- Assembly sequence logic. Components should assemble in a linear sequence: A to B to C, not "hold these four pieces in position while someone bolts them together." Where simultaneous positioning is unavoidable, design temporary support points — legs, ledges, or temporary clips that hold position while the permanent connection is made.
- Component weight targets. The standard two-person lift threshold for general labor is approximately 100 pounds. Components above this threshold require mechanical assistance (chain motors, forklifts, lift gates) that may or may not be available, and that add time and complexity. Design components to stay under 100 lbs where possible; document weight on any component that exceeds it.
- Pre-assembled subassemblies. Lighting truss sections, AV rack frames, overhead element frameworks — these can be pre-assembled in the shop and shipped as single components rather than as kits of parts. The labor saved on the show floor is real; the crate engineering required to ship pre-assembled components safely is worth the investment.
- Standard hardware throughout. Every fastener in the exhibit should use the same hex key size, the same bolt head, the same driver bit. A crew that has to switch tools for every different connection loses time to tool sorting and mistakes.
- Chamfered and padded edges on handled components. Components that are hand-carried between installation steps should have chamfered edges and padded corners. Exhibit surfaces get damaged during installation, not just during transit.
- Resolved leveling strategy. Document how the exhibit is leveled on uneven floors. Adjustable feet, shim points, or baseline reference components — the strategy should be designed in, not improvised on site.
- Electrical connection accessibility. Every electrical connection point should be accessible without disassembly. Wiring runs should be designed to connect after the structural elements are in place, not threaded through structures during assembly.
- Graphics mounting after structure. Graphic panels should attach to a complete structure, not mid-assembly. Panels attached during structural assembly get scuffed and misaligned when adjacent components are added.
- Visible datum and reference points. Mark the exhibit's centerline and critical datum points on structural base components. A floor plan indicating the exhibit's orientation relative to the booth space (with aisle direction noted) eliminates the "which way does this face?" question that costs twenty minutes on every first install.
Fabricators who've built exhibits for clients with serious show schedules — HIMSS, CES, SEMA, the major medical and automotive shows — often report that these disciplines become non-negotiable after one or two difficult installations. The shift happens when the fabricator, rather than the I&D crew, absorbs the cost of a slow installation through client dissatisfaction, post-show repair work, or damaged relationships. Shops like Innovate 3D, which bring CNC fabrication, large-format 3D printing, and foam carving under one roof, apply this kind of integration thinking precisely because controlling the full production chain makes it possible to pre-test assembly sequences in the shop before the exhibit ships — a practice that consistently reduces show-floor surprises.
Component Labeling and the I&D Manual
The installation manual is the single most consequential document a fabricator produces. It's the difference between a crew that moves with confidence and one that stops every fifteen minutes to interpret an ambiguous drawing or find a missing part.
Every component in the exhibit should carry a label that identifies its crate of origin, its component ID, and its drawing reference. The naming convention should be logical and hierarchical: crate 1 contains components 1A through 1G; the drawing reference for component 1C is Sheet 3, Detail 2. A crew member holding a component should be able to find it on a drawing in under thirty seconds.
The installation manual itself — twenty to fifty pages for a major island exhibit — should be structured as a phased assembly guide. Each phase corresponds to a discrete structural stage: base and leveling, primary vertical structure, overhead/truss elements, secondary infill panels, lighting and power, graphics and finishing. Each phase begins with a materials list (which components, which hardware), includes an exploded-view assembly drawing, and ends with a quality check (confirm dimensions, confirm torque, confirm level before proceeding to next phase).
Hardware identification in the manual should use photographs, not just drawings. A field crew encountering M8 × 20mm socket head cap screws should see a photo of exactly those screws in the hardware caddy labeled "Hardware Pack 3," not a dimensioned drawing they have to interpret. The investment in hardware photography — a few hours in the shop before the exhibit ships — pays back immediately in field efficiency.
The installation manual is where months of fabrication precision either transmit successfully to a crew of strangers — or fail silently on an eight-hour clock.
One protocol that significantly improves I&D performance: a pre-ship test assembly in the shop. Before crating, assemble the exhibit fully (or the most complex subsystems) using only the documentation that will ship with the exhibit. Time the assembly. Note any ambiguities, missing labels, or connection sequences that required interpretation. Revise the documentation before shipping. This one practice, commonly employed by exhibit houses with serious I&D track records, eliminates most of the field problems that generate post-show client conversations.
Union Labor Jurisdiction: The Design Implications
At most major U.S. convention venues, specific installation tasks fall under collective bargaining agreements that define which union local performs which type of work. The jurisdictional landscape varies by venue, but several rules are consistent across McCormick Place, the Las Vegas Convention Center, Javits Center, Orange County Convention Center, and most other Tier 1 venues:
The International Brotherhood of Electrical Workers (IBEW) covers electrical connections at the venue panel. Under-booth power distribution — bringing 120V from a hardwire point to individual exhibit components — is IBEW work. The practical fabrication implication: pre-terminated power whips. An exhibit with all branch circuit wiring terminated to standard male connectors (typically 5-20P or L5-20P) reduces IBEW labor from an hour to a five-minute final connection. An exhibit with individual component wiring that requires field termination adds IBEW labor for every connection point.
Rigging of overhead elements goes to the stagehand local at most venues. Elements designed to hang from overhead rigging points — pendant lighting arrays, suspended truss, hanging sign structures — require union rigging labor regardless of the exhibit house's own installation crew. Overhead elements designed to attach to floor-supported upright structures (rather than venue rigging points) typically avoid this jurisdiction, which is why floor-supported overhead frameworks are common in exhibit design.
Drayage — moving crates from the loading dock to the booth space — is performed by the official show contractor's labor at most venues. Understanding that the exhibit's crates will be handled by show drayage, not by the fabricator's crew, reinforces the importance of proper crate construction and labeling. Crates that don't clearly identify their booth number, exhibitor name, and placement sequence will be stacked in whatever order the drayage crew finds convenient.
The fabricator who researches union jurisdiction before finalizing structural connection approaches for a specific show is preventing problems, not just complying with rules. A structural connection approach that saves two hours of general labor time but creates four hours of IBEW labor time is a net loss — and an uncomfortable client conversation.
Dismantle: The Forgotten Half of Every Show
Dismantle receives perhaps one-third the design attention that installation does, and this imbalance creates real problems. Dismantle happens under the worst conditions of any phase: crews are tired, show hours have been long, the convention center needs the floor back quickly, and the "get it in the crates" pressure is intense. Exhibits designed for dismantle arrive home with fewer damaged components, fewer missing parts, and fewer calls from the next show's installation crew asking where a specific component is.
Dismantle-designed construction has several specific characteristics. First, the reverse assembly sequence is as logical as the forward sequence — components that were installed last can be removed first without disturbing other elements. Second, hardware caddies are designed for return: each caddy has a labeled home position in a specific crate, and the dismantle protocol specifies exactly where hardware is returned so it isn't buried loose in a crate of panels. Third, crate return assignments are documented per component, so the dismantle crew isn't making decisions about what fits where under time pressure.
The dismantle documentation can be as simple as reverse-phased assembly drawings with "remove in reverse order" notes on each phase, or as detailed as a separate dismantle guide. The level of documentation appropriate for a given exhibit correlates with its complexity and the frequency with which it will be installed by different crews. An exhibit that tours thirty shows per year with a consistent installation crew needs less dismantle documentation than one that goes to five shows annually with a different venue crew at each.
The Post-Show I&D Debrief
The most underused design improvement tool in exhibit fabrication is the post-show I&D debrief. The crew that installed and dismantled the exhibit has direct, granular feedback about every connection that required extra effort, every panel that was ambiguously labeled, every hardware pack that was located in the wrong crate, every component that was heavier or more awkward than the drawing suggested.
A systematic debrief protocol doesn't require much: a fifteen-minute call with the I&D crew chief within a week of the show, structured around four questions. What took longer than expected? What was unclear in the documentation? What would you change about the hardware or component design? What broke or got damaged during installation? These four questions, asked consistently after every show, generate a design improvement backlog that is directly traceable to real field performance.
Exhibit houses that have institutionalized this practice report measurable improvements in I&D efficiency across consecutive shows with the same structure. After three deployments, connection details are typically more accessible, the most common assembly ambiguities have been resolved in the documentation, and the heaviest or most awkward components have been redesigned or pre-assembled. The exhibit that was difficult to install at Show One is straightforward at Show Four — not because the crew got better, but because the fabricator applied feedback systematically.
The shift from treating I&D as the client's problem to treating it as a design discipline is what separates exhibit fabricators who earn long-term relationships from those who rebuild exhibits every cycle. Installation day is the final review of every fabrication decision made in the preceding weeks. The best exhibit shops design with that review in mind from the first drawing.